Entering Supply Codes in Barnestorm
Supply codes can be managed in Barnestorm Office > Codes > Rates > Supply Codes. Follow the guidelines below to enter and maintain your agency’s supply list.
🔹 Adding a New Supply
-
Use a 7-character alphanumeric code (letters and/or numbers) to create a unique supply code.
-
Enter a clear and detailed description, including size or measurement (e.g., "4x4 gauze" or "2-inch tape").
-
The Vendor Code is optional. However, if you want to track preferred vendors, you can add new vendor codes under:
Barnestorm Office > Codes > Other Basic Codes > Vendors
-
Vendor codes are especially helpful if you're using the Supply Inventory feature to reorder items.
-
Include vendor-specific item codes to simplify future reorders.
🔹 Required Coding
Ensure you enter the correct:
-
Revenue Code
-
HCPCS Code
-
Modifiers
-
Place of Service
📌 Need help? Refer to the linked articles for code guidelines.
🔹 Configuring Quantity and Cost
Refer to the attached article for step-by-step guidance on setting up:
🖨️ Printing Supply Information
You can search and print supply lists by:
-
Code
-
Description
-
HCPCS
-
Category
-
Vendor
-
DNU (Do Not Use)
To find DNU-marked supplies:
🧾 Supply Reports
Choose how you'd like to sort the report (e.g., by Code, Category, or Vendor), then pick from:
✅ Tip: When printing by Category, you can filter a specific category in the search field, or leave it blank to print all.
📅 Optional: Check the box "Only Items Used in Last 6 Mos." to filter recent items.
🏷️ Printing Supply Labels
To print supply labels:
-
Click Print Supply Labels
-
Choose your label paper
-
Enter the supply codes (comma-separated)
-
Enter the quantity of labels per item
-
Optional: Check Print Vendor Code on Label
-
Click Create Labels
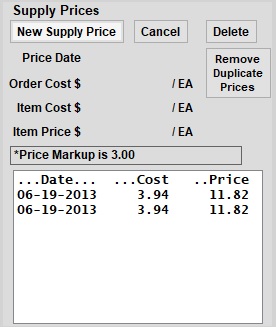
❌ Deleting Supply Rates
⚠️ Warning: Deleting a rate will remove it permanently and affect any previous supply charges using that rate. Always confirm with your team before proceeding.
To delete a rate:
-
Search for the supply code.
-
Select the rate/date.
-
Click Delete in the Supply Prices window.
No confirmation prompt appears—make sure it's the correct entry.
🧹 Remove Duplicate Prices
This feature is available when identical prices exist on consecutive dates.
Example:
-
✅ Will delete: 8/15/17 - $4.00 and 10/12/17 - $4.00 → deletes 10/12
-
❌ Will not delete: 8/15/16 - $4.00, 1/15/17 - $3.75, 10/12/17 - $4.00 (non-consecutive or different prices)
Delete or Mark Supply as DNU
-
If the supply was entered by mistake and never used, you may delete it.
-
To hide a supply without deleting:
