Use the Employee Activity > Schedule Entry screen to key in scheduled visits.
The top part of the screen is where the scheduled visits are added. The bottom part of the screen is where you can view the entries that have already been entered.
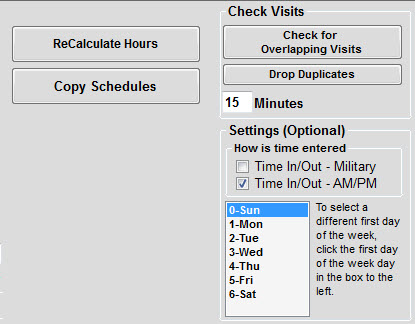
Check Visits
How is time entered: Military time allows you to enter military time. When AM/PM is checked you may need to specify if the time is in the AM or the PM.Ex. If you enter 0700 and press enter, Barnestorm will mark the time as07:00 AM. If you enter 0600 and press enter, Barnestorm will assume the time is 06:00 PM. Time entered before 0700 without specifying AM or PM will be marked as PM.
For The Week Beginning: Select the week you are entering schedule visits for. Use the drop-down calendar or the -1 Week or +1 Week to select the week. You will notice the Days/Dates in the middle of the screen change as you select a different date.
If you want your week to start on a different day then select the day from the list of weeks (0-Sun, 1-Mon, etc).
Check Visits: This feature will check to see if any employee has overlapping scheduled entries,starting with the number of minutes entered.Click on the Check for Overlapping Visits button and the list will appear at the bottom of the screen.
Copy Schedules: This will take you to a different screen to copy schedules for all, one patient or one employee. See attached link for instructions.
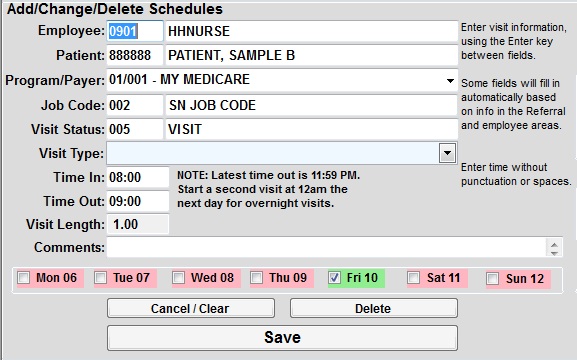
Enter a new scheduled entry
Use the [Enter] key to move to the next field.
- Enter the employees four-digit code or search for them by name.
- Enter the patient’s six-digit chart number or search for them by name.
- The primary payer will show up as default. If that patient has multiple payers, select the drop-down list to change the payer.
- The employees job code will show up as default. You can change it as needed.
- Enter the three-digit visit status code or search for it by name.
- Optional: Select the visit type from the drop-down list.
- Enter the time in / out.
- Optional: enter comments regarding the visit.
- Check the box of the days the patient needs to be seen.
- Click on Save.
- The bottom screen will pull up all scheduled entries for the week you are keying.
Edit a scheduled entry
When you edit an entry you can only edit one at a time.
- Enter the patient’s six digit chart number or employee number if needed, into the bottom part of the screen.
- Select the week of the entry you need to change.
- Click on the Refresh button.
- Select the entry from the list that was populated.
- Correct the scheduled entry from the top part of the screen.
- Click on Save.
Print schedules
You can sort the schedules by employee or by patient.
- *Optional* Enter the employee number or the patient chart number into the bottom part of the screen. Leave blank to select all entries.
- Select the week you want to view using the -1 Week or +1 Week.
- Select Sort by Employee or Sort by Patient.
- If you want to add a page break after each employee or patient check the Page Break box.
- If you sort by employee you have the option to add the patient's phone number and address at the bottom of the each schedule. The address and phone will only appear if the Page Break is selected with Sort by Employee.
- Click the Refresh button.
- Click the Print button.