Documenting HOPE Assessments
Barnestorm Office and Point-of-Care > Hospice Item Set
Overview
- How to open the HIS and HOPE screens.
- General HOPE timing guidelines (including HUV windows).
- How to generate a Symptom Follow-up Visit (SFV) schedule when required.
- Quick tips for how the new HOPE screen works.
- Complete/Validate/Lock/Exporting the record.
HOPE or HIS Screen: Yes (HOPE) or No (HIS)
- Discharge on or before September 30, 2025. Submit HIS Admission and HIS Discharge (select No).
- Admit on or before September 30, 2025 and discharge on or after October 1, 2025. Submit HIS Admission (select No) and HOPE Discharge (select Yes). No HUVs in this crossover case.
- Admit on or after October 1, 2025. HOPE screen defaults. HOPE Admission, HOPE Update Visit(s) if triggered, and HOPE Discharge.
- HUV timing: HOPE Update Visits appear when due. Example: HUV1 is due from day six through day fifteen after admission.
Main Screen Indicators

- A0250 — HA, HUV1, HUV2, and HD are auto-generated the first time you open the HOPE screen on or after the first eligible day. They do not appear before that date.
- HUV1 due days 6–15 after admission (shows starting day 6)
- HUV2 due days 16–30 after admission (shows starting day 16)
- HD appears when a discharge date is entered in Referral
- From/Thru Date — the record timeframe based on the admit date.
- SFV Due (schedule/assessment-based indicator) — J2051
This column reads the Schedule and Visits/Assessments screens (not HOPE data). It looks for a visit with visit code 500 – Symptom Follow-Up Visit.
- Red — Unscheduled: No SFV is on the schedule, or the scheduled visit is not using code 500.
- Yellow — Scheduled, not assessed: An SFV with code 500 is scheduled, but the SFV assessment has not been completed.
- Green — Scheduled and assessed: An SFV with code 500 is scheduled and the SFV assessment is completed (within the due window).
- Blank/Empty: J2051 did not trigger an SFV.
Notes: The color only indicates the presence/absence of a qualifying schedule/assessment entry and completion status of the SFV assessment. It does not by itself confirm HOPE data. Document the SFV assessment to satisfy the measure.
Documenting
- Click the entry to begin and answer each question.
- Circles = select one; Squares = check all that apply.
- Skip logic applies automatically.
- Some screens use Save Answers to Continue and require a date (e.g., J0910, J2040, J2050).
- Next saves as you go.
Smart Features - I0010: Pulls diagnoses from ICD History.
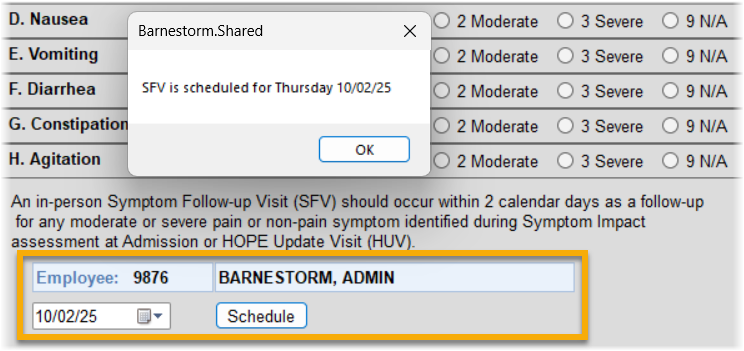
- J2051 Symptom Impact:
- If “Moderate” or “Severe,” an SFV Schedule pop-up appears.
- Enter the employee/date and schedule the follow-up visit.
- This will appear as a visit on their schedule for a Symptom Follow-up Visit.
Z0400 – Signatures
- Click Line to be Added/Edited.
- Add one signature per line (A–H).
- Search employee, select sections completed, add date, then Save.
- Continue with Line B (if applicable).
Complete · Validate · Lock · Export (HOPE)
From Z0500 (after all answers are entered):
- Mark This HOPE Record as Complete If No Errors — An internal check runs. Fix any items, then click again until it completes.
Validate with iQIES (VUT) – recommended Assessment Management: Assessment Submitter Manual
- From the HOPE screen, with record selected, click Lock → from pop-up choose Yes to Validate in iQIES (VUT).
- In iQIES: Accept and Proceed → select HOPE Data → Upload Test Assessments.
- Browse to
C:\Barnestorm\Office\A_Hope_To_Be-Validated.XML → Open. - Accepted: return to Barnestorm and confirm Yes to Lock the record.
- Rejected: review the error details, correct in Barnestorm, then Lock → Validate again.
Note: VUT is not required but strongly recommended before export.
Export & submit:
- Go to Barnestorm Office → Admin → Export Hospice (HIS).
- Choose HOPE (or HIS when applicable) → Find → select records you want to import.
- Choose the folder you want to save your import file to.
- Click Create to generate the
HOPE_Export.zip or HIS_Export.zip. - The screen will show you where the file is saved, including the name. This is the file to select when uploading in iQIES.
- Sign in to your iQIES or QIES account and upload the ZIP. (Barnestorm does not provide iQIES portal instructions.)
Tracking HUV1 and HUV2
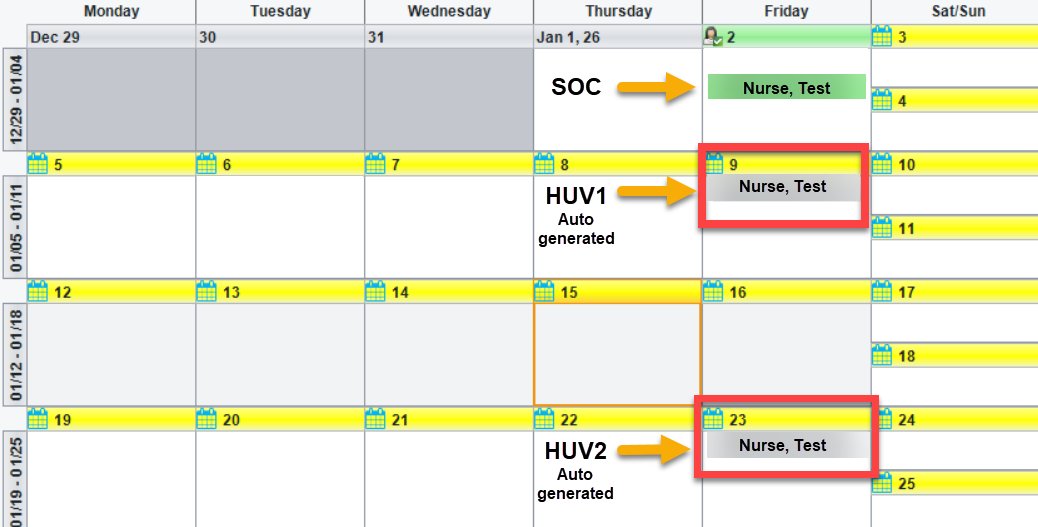
HUV1 / HUV2 Placeholder SchedulesHUV1 and HUV2 schedules are created in advance to help ensure required visits are not missed.Because the exact service date is often unknown at the time of the SOC, these schedules act as placeholdersto track when the patient is due. As the date approaches, the nurse can move the schedule to the appropriate day.
How the Schedules Are Created
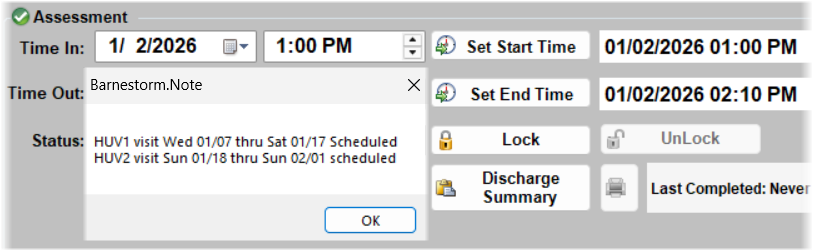
- During the SOC visit (Assessment Type 01), selecting Set End Time on the Finish screen automatically creates the HUV1 and HUV2 schedules and shows a reminder.
- HUV1 is scheduled 7 days from the SOC date (same day of the week). If the date falls on a Saturday or Sunday, it is moved to the following Monday.
- HUV2 is scheduled 14 days after the HUV1 date.
How Nurses Should Use the Schedule
- The Comments section of each schedule displays the valid date range when the HUV visit is due.
- This date range also appears on the Select Patient > Schedule screen (comments section of schedule).
- Use the schedule as a reminder and move it to the exact visit date once the timing is confirmed.
ExampleSOC: 1/2/2026
HUV1 (Days 6–15): 1/8/2026 – 1/17/2026
HUV2 (Days 16–30): 1/18/2026 – 2/1/2026
HIS Information
More Information on HIS
The CMS HIS page includes the HIS Manual (see the Downloads section).
Open CMS: Hospice Item Set (HIS)
Complete the Hospice Item Set in Barnestorm
- Select a patient with a hospice payer; the Hospice Item Set button appears on the main menu.
- Click Hospice Item Set > New to start. Answer each question; skip logic advances to the next item.
- Some items prompt for an assessed date.
- The same screen is available in Point of Care (main menu and within a visit assessment).
Validate the HIS
After completing all answers, validate to view messages:
- Error – must be corrected to lock
- Warning – can still lock
- Informational – can still lock
Click any listed item to jump to and correct it. When errors are resolved, Save; if complete, you may also Lock.
(*Messages originate from the CMS validation tool.*)
Lock the HIS
- After validation and Save, return to the HIS list.
- Important: Only Locked HIS can be exported.
- Select the record and click Lock (the Locked area shows the date).
Export HIS from Barnestorm
- Go to Admin > Export Hospice (HIS).
- Click Find to list Hospice Item Sets.
- Select records (use Check All if needed) and click Next Step.
- Choose the export folder (your HIS directory).
- Click Create to generate the export zip.
- Log in (link provided) and upload the zip.
HIS Error Messages
For details on HIS errors, open the Hospice Submission User’s Guide (Error Messages section):
QTSO: Hospice Providers – Reference Manuals