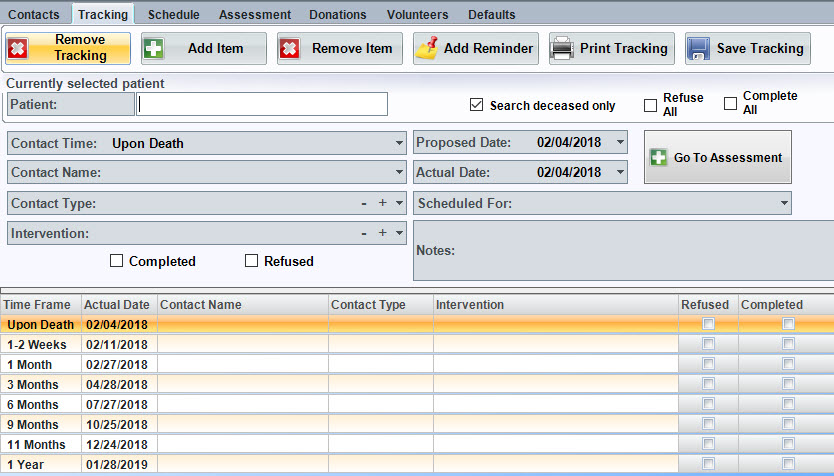
The Bereavement Tracking screen allows you to track the Bereavement Process.
Note: Bereavement tracking works only if you have at least one bereavement contact entered, because the tracking must be associated with a contact. If the tracking isn't working, Add a Bereavement Contact and then go to Tracking.
To Add Bereavement Tracking Schedule
1. Select the deceased patient from the Select Patient screen.
2. Click the Bereavement button.
3. Click the Tracking button.
4. Click Create Tracking. This will populate the tracking schedule based on your defaults and using the date that the patient passed as the starting point for bereavement tracking. If you only need the default bereavement items, your tracking entry is complete.
To Indicate Tracking Items are Completed
1. Select the tracking item.
2. Check the Completed or Refused box, as appropriate
3. Proposed Date - this should be populated already.
4. Actual Date - Enter the date that the tracking item was completed.
5. Scheduled For - Use the dropdown to select the appropriate response.
6. Notes - Type in any notes applicable.
7. Optional - Refuse All or Complete All check boxes. This will mark all Tracking as Refused or Completed, at bottom of screen.
8. Click Save Tracking to save the entry.
9. To print, click Print Tracking.
To Add a Custom Tracking Item
1. Click Add Item to add a new entry.
2. At Contact Time, use the dropdown box to select the appropriate time
3. At Contact Name, use the dropdown box to select the appropriate name. If name is not in the list, follow instructions to add Bereavement Contact.
4. At Contact Type, there are 2 options:
dropdown box = Use this to select predefined contact types.
+ sign = You can add a new contact name. You will need to type in the name first. Then click the + sign. A popup will
appear. Select Yes, to save the new entry. The contact will now appear in the dropdown with other options.
5. At Interventions, you will have the same options as mentioned above. Use the dropdown to find the appropriate intervention or use the + sign to add one.
dropdown box = Use this to select predefined interventions.
+ sign = You can add a new intervention. You will need to type in the intervention first. Then click the + sign. A popup will
appear. Select Yes, to save the new entry. The intervention will now appear in the dropdown with other options.
6. You also have the option to Add Reminder. You will need to click on the item at the bottom of the screen, for the message screen to appear.
Edit A Bereavement Tracking Item
1. Select the deceased patient from the Select Patient screen.
2. Click the Bereavement button.
3. Click the Tracking button.
4. Select the entry (from the bottom) that needs to be edited.
5. At top of the screen, make the needed corrections.
6. Click Save Tracking to save the entry.
Remove a Bereavement Tracking Item
1. Select the deceased patient from the Select Patient screen.
2. Click the Bereavement button.
3. Click the Tracking button.
4. Select the entry (from the bottom) that needs to be removed/deleted.
5. Click Remove Item.
6. A popup will appear. Select Yes, if you want to remove the item.
Remove Tracking for a Patient
*NOTE: This removes ALL tracking for the patient.
1. Select the deceased patient from the Select Patient screen.
2. Click the Bereavement button. The Bereavement Contacts screen will appear with the patient's chart and name displayed at the top.
3. Click the Tracking button.
4. Select Remove Tracking
5. A popup will appear. Select Yes, if you want to remove the tracking.