This is a very detailed article that walks through the steps on how to post Medicare Advantage payments. The payments must be entered a certain way in order for the PPS tracking system to update the episode status to PAID. These instructions do not apply to traditional Medicare. First, you will need to verify the correct ERA Codes (payment/adj codes) are set up correctly.Set up the ERA Codes
In order for the Update PPSTracking From Payments to work properly you must set up the ERA codes first. This is a place where you set up the payment and adjustment codes for Medicare and non Medicare PPS payers. You have two choices, you can use the same EOE payment, and Adjustment codes for all PPS payers (Medicare and non Medicare) or you can use one set of codes for Medicare and another set up codes for non Medicare. Updating the PPS Tracking will not work if you use a different set of codes for each nonMedicare payer. Example: having two codes set up for each payer (EOE, Adjustment).
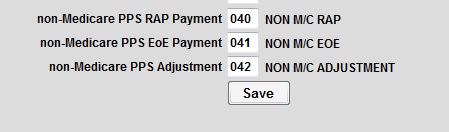
If you do not have any nonMedicare PPS payment/adjustments codes set up yet and wish to do so, see article number 50477 on how to set them up.
To set up which payment and adjustment codes to use go to Accounts Receivable > Post Payments >Set Up ERA Codes. The picture below is just the example of what the nonMedicare codes look like.
**NOTE: Medicare discontinued RAP payments effective date of service 01/01/2021.
Set up the payment codes in the payer screen
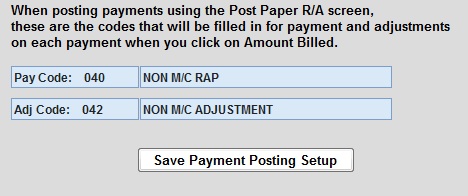
You can set up the payment code in the payer screen so that when you’re ready to post the payments, the RAP and EOE code is already there. From Codes > Program Related Codes > Payer, enter the program and payer number.
Enter the RAP payment code in the pay code section. Enter the adjustment code in the Adj code section. There’s no need to enter the adjustment code when posting EOE payment. The Update PPS Tracking part will do that for you. These codes will be the same codes that you have set up in the ERA Codes from above.
Process of posting payments
This is what the AR Inquiry screen will look like when you first create the RAP. It will be timestamped with that day's date and the Amount Billed of 0.01 to acknowledge the episode as created in Barnestorm. The Year/Mo is the billing month. Each 485 episode can have up to 2 billing periods; the first 30 days is marked with an A and the second 30 days is marked with an B. This is especially helpful when both 30 day periods start in the same month.

Entering the EOE payment: Accounts Receivable > Post Payments > Post Paper Remittances
The next steps would be to create and send the EOE claim when ready. After the EOE payment has been received, you can enter it into the Post Paper Remittances screen. Below is an example of how it should be entered.
-
Type in the patient name or chart number, and select the correct 30 day period (A or B) you are posting against
-
The Add/Edit Accounts Receivable window will open
-
Change the Transaction Date to the bank date, or the date the payment was received
-
For the $Amount #1, key in the EOE payment, making sure to use the correct EOE posting code
-
For the $Amount #2, key in the EOE adjustment amount. (This is Optional, if you leave it blank the system will automatically post the adjustment during the steps below.)
-
Enter any comments and Click on Save.
-
Follow tab options to View Details, and View Totals
-
If totals look correct, click Approve Totals
-
Click Post Entries to complete the posting
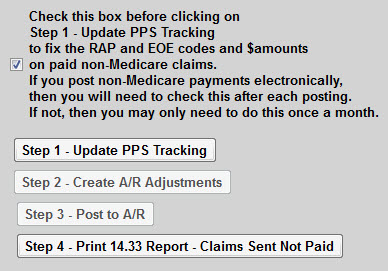
The next step is to post any payer adjustments and mark the episode as Paid/complete. Click Post Payments tab and select Update PPS Tracking From Payments. (You will need to do this step for manual postings and for electronic postings for PPS payers)
-
Check the box above Step 1. This step will make sure nonMedicare AR is posted correctly.
-
Click the Step 1 - Update PPS Tracking button. (If no new payment is found, the process stops here. If payment(s) is found, the Step 2 button will activate.) Click Close to exit the preview.
-
Click the Step 2 - Create A/R Adjustments button (If nothing is found, the process stops here. Either the payer paid in full, or you manually entered the adjustment in the steps above) Click Close to exit the preview.
-
Click Step 3- Post to A/R button to complete the posting/mark episode as PAID/Complete. Click X to exit the window.