Barnestorm Office: from the main menu, click Employee Activity. A menu will pop up; select Non-Visit Entry.
Barnestorm POC: from the main menu, click Non-Visit Time. *Note: if you want the new non visit screen to be default click the box "Make This Screen My Default Non-Visit Entry Screen". The new non visit screen will show up as default. If you go back to the old non visit screen, it will at that time become your default screen. 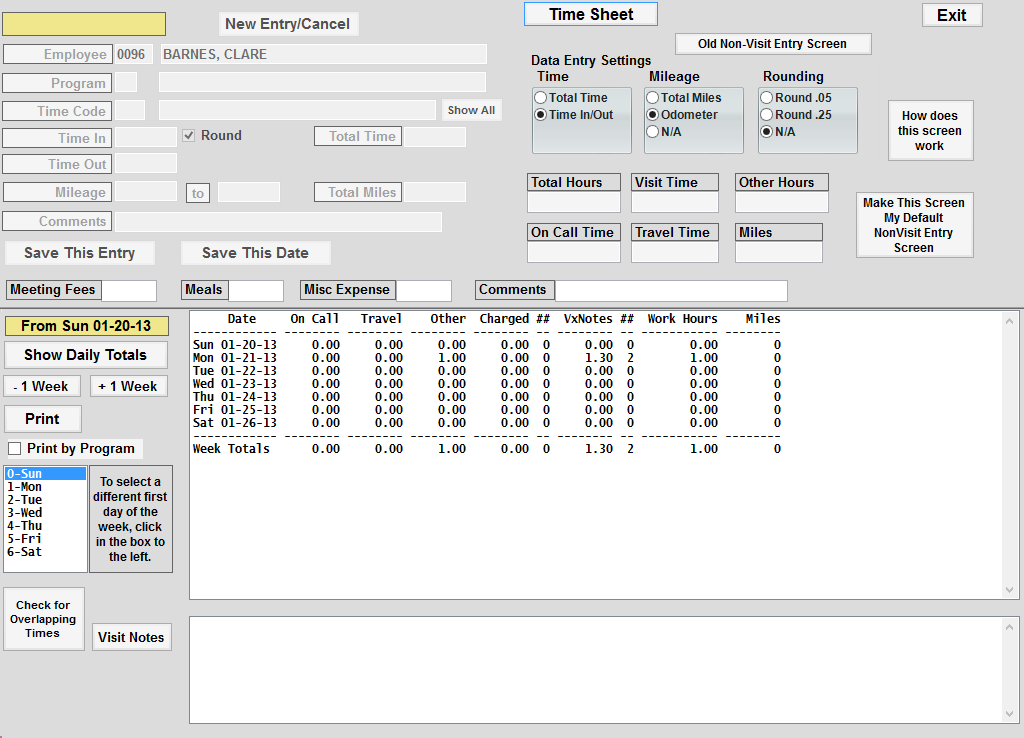
The bottom panel always shows one week of dates. To add or change time for past or future dates (up to 30 days in the future) click on the -1 Week or 1 Week button to change the week being displayed. - Click on the date to be added/changed in the large white bottom panel. The display in the bottom panel will change to show you the details of entries for that date. Charges show the visits that were manually entered from Barnestorm Office. Visits will show the assessments that visiting staff enter using Barnestorm Point-of-Care. Clinical staff will see their visits for that day at the bottom of the screen next to Visit Notes.
- To add a new entry, click the New Entry button at the top, then enter the new data. If you don’t know the codes, then enter the description in the text box to the right (for example, you could enter "TRA" and that would bring up options for Travel). Enter Time In, Time Out, and Mileage if applicable. You can also add a comment (for example, travel from patient A to patient B). Then click the button for Save This Entry. ** Use the [Enter] or [Tab] key as you move to each entry. This will fill in the description and calculate each field appropriately.
- Shortcuts: Use the down arrow key in the Time Code field to pull up the list of codes. If your time in/out starts at the beginning of the hour, just type in the digit or two and press enter - ex. type 9 press enter for 09:00 AM. As you press enter to go through the fields, it will Save This Entry when you have entered through all fields.
- To change an entry, click on it in the bottom panel and it will be displayed at the top. Enter thru the fields on the screen, making changes as needed, and when you hit [Enter] on the Save This Entry button, it will mark the set of entries as needing to be saved by turning the Save This Date button red. Click Save This Date when you are completely done with that day.
- The bottom panel always shows one week of dates. If a date has * beside it, there are duplicated entries for that date. All duplicate dates should show up for you to review. Select the incorrect date and delete each entry. Click on the Save This Date button.
- To delete an entry click on the entry and type in DELETE into the comments. Click Save This Entry, and you will see Delete next to the entry in the bottom panel. When you are done click Save This Date.
- To add or change time for past or future dates (up to 30 days in the future) click on the -1 Week or 1 Week button to change the week being displayed. Click on the date to be added/changed in the bottom panel. Enter the non-visit time and mileage. Click on the Save This Entry button.
- You can enter multiple entries in a row for the same date – hit [Enter] or click on the Save This Entry button for each time/mileage entry.
- Be sure to click the Save This Date button before exiting the screen. If you try to exit without saving, you will get a message asking if you want to save that date.
- Data Entry Settings (on the right side of the upper screen):
- You can decide if you enter a total or an actual time in/time out.
- You can decide whether to enter total miles, an odometer reading, or N/A.
- You can decide how you want to round off the time, by .05, .25, or N/A.
- If you have an entry for, lets say, education and you need to get reimbursed for mileage and/or expenses. You can enter in your time for the education, mileage and you can also enter in amounts for Meeting Fees, Meals and Misc. Expenses, along with comments. These boxes are located under the Save This Entry and Save This Date buttons. This information will not show up on your time sheet, but you can run a separate report. Go to Reports > Employees > 02.08 Mileage Reimbursement report. You can print this report which will list all the information that is needed to be reimbursed, sign it and you can hand this in as part of your documentation to get reimbursed. If you are entering this in POC you can ask your office staff using Barnestorm Office to print it out for you.
* If additional non-visit codes need added to the system, go to Codes > Program Related Codes > Non-Visit Time Codes to add them. * A max of 18 entries are allowed per date.
Attachments
Related Links
Add Your Comments
|
Last Modified:Monday, January 08, 2024
Type: HOWTO
Rated 5 stars based on 1 vote
Article has been viewed 10,865 times.
|