Bill Medicaid Claims
NC Medicaid Direct (NCTracks) – Process Flow
Verify Eligibility
→
Visits Audited / Imported
→
YOU ARE HERE
Claims Created
→
Transmit to NCTracks / Post Charges
→
Post Remit File
Overview
This step creates Medicaid claims (837) from imported visit charges (Employee Activity > Visit Entry).
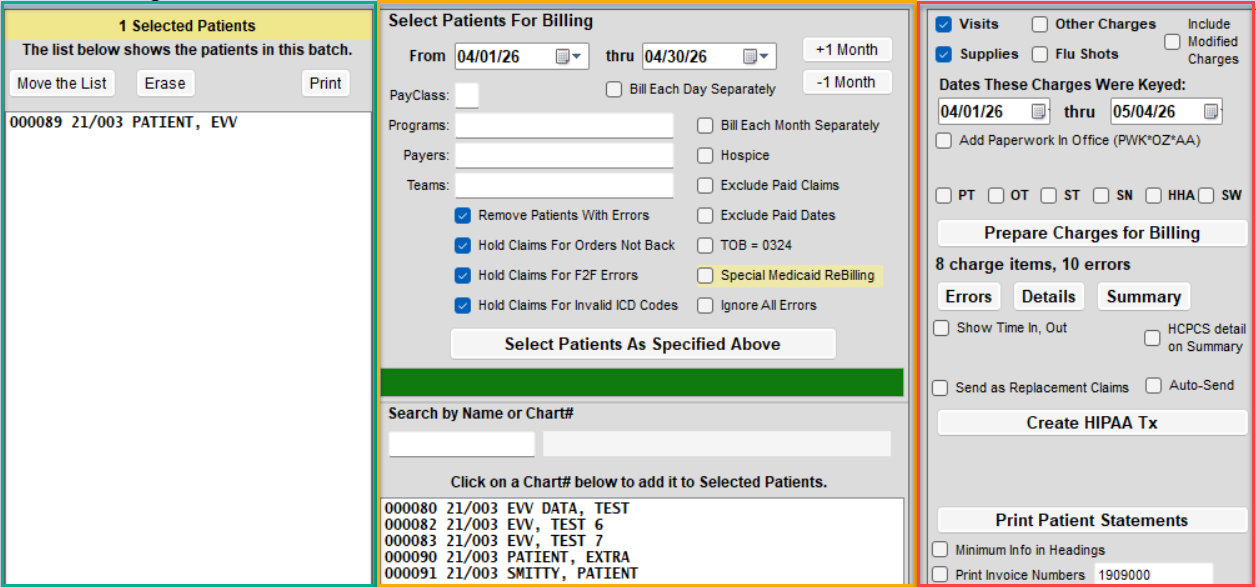
Understanding the Billing Screen Layout
The All Other Billing screen is divided into three panels. Use them in the order listed below.
- Panel 2 – Billing Criteria: Set billing dates, program(s), and payer(s).
- Panel 1 – Patient List: Review the list of active patients for the criteria.
- Panel 3 – Charge & Claim Actions: Prepare charges, print reports, and generate the 837 file.
How to Create Medicaid Claims - Standard Clean Claims
- Go to Billing > All Other Billing.
- Enter your From and Thru service dates.
- Select the appropriate Program(s) and Payer(s).
- It is recommended to select one payer at a time.
- Optional filters:
- Search by Name or Chart# – bill a single patient or build customized list
- Check Bill Each Day Separately
- Generates one claim file while splitting each date of service into its own claim. For NC Medicaid, this reduces the risk of all visits for a patient going into pending when a single date has an issue.
- Click Select Patients as Specified Above if you do not build a customized list.
- This will use your filter options to add active patients during the time frame.
- First Panel: Review the list. You can click on a name to remove from the billing list.
- Click Prepare Charges for Billing.
- A report will appear if there are errors. Review the errors and correct before proceeding.
- You can remove patients from the list at this point, but you'll need to click the Prepare Charges button again.
- You'll have an option to view a summary or detailed report of charges.
- Once you have confirmed charges appear accurate you can click the Create HIPAA Tx button.
- Print is optional. This report shows the name of the billing file.
How to Send Claims
Send claims via SFTP in Barnestorm:Transmit Files to NC Medicaid
If you are not set up for SFTP, upload through the NCTracks portal>:Upload Claims in NCTracks
Printing paper claims can be done from Billing > Print UB04/1500:Print / View an UB04 / 1500
Advanced: Additional Filter Options
Panel 3 – Charge Type: Select the type of charges you are billing (Visits, Supplies, Flu Shots, Other Charges).Make sure the appropriate checkbox is selected.
Dates These Charges Were Keyed: Defaults From = billing From date and Thru = today.Change these dates only if you want to capture charges keyed during a specific time frame (example: late entries).
Include Modified Charges: When checked, includes charges that were added or modified during the keyed date range.When unchecked, includes only charges added during the range.