Overview
Use the steps below to discharge a patient from a payer in Barnestorm. This process can also remove future schedules, if needed.
ImportantIf the patient has future schedules under the payer being discharged, Barnestorm will prompt you to remove them.This is especially important for employees using the Care Champ app.
Method 1: Discharge from the Payers Tab
- From Barnestorm Office, pull up the patient from Select Patient screen.
- Go to Referrals > Payers tab.
- Select the payer being discharged.
- Check the Discharged checkbox.
Select the Discharge DateIf you are discharging the
primary payer, choose one of the following:
- Option A: Use the calendar drop-down to select the discharge date.
- Option B: Click Find Last Visit Date to automatically set the discharge date to the most recent visit or supply charge.
NoteIf the payer is
Hospice and a
Death Date has been entered on the Patient Information tab,that date will be used automatically.
Once the discharge date is entered:
- Patient Status updates to Discharged – Goals Met
- If a death date is found, status updates to Deceased
Complete the Discharge
- Select the appropriate Discharge Reason from the DC Reason drop-down.
- Click Save Payer.
- This is especially important for employees using the Care Champ app, because it removes those visits from the mobile schedule.
- If future schedules exist under that payer, Barnestorm will ask if you want to remove them.
- Select Yes or No as needed.
- Click Save All Patient Data.
Patient StatusIf needed, you can manually update the patient status from the Referral Information tab.
If the Patient Remains Active with a Different Payer
If the patient is simply changing payers and continuing services:
- Add the new payer
- Mark the new payer as the Primary Payer
This will automatically return the patient’s status to Active.
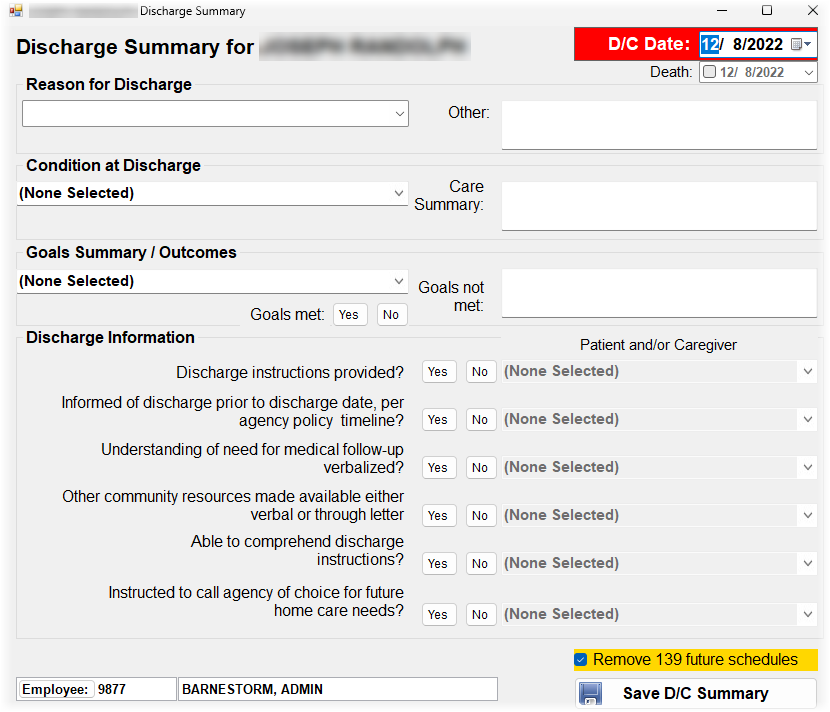
Optional Method: Discharge Summary Feature
You can also discharge the patient from:
Referrals > Referral Information tab > Discharge Summary
This screen lets you document:
- Condition at discharge
- Goals summary and outcomes
- Additional discharge information
What This Screen Does Automatically - Sets the discharge date
- Updates patient status
- Prompts to remove future schedules
How to Complete the Discharge Summary
- Enter the D/C Date at the top of the screen.
- Only enter the Death Date if the patient expired.
Date Definitions - D/C Date updates the discharge date on the Payers screen
- Death Date updates the death date on the Start screen
- Answer each discharge question that applies.
- If future schedules exist, review the checkbox near the bottom showing the number of future schedules.
- Leave it checked to remove those schedules.